Why FINIS FRIDAYS?

Most adult ballet beginners are exactly that: professional adults—lawyers, doctors, teachers, bankers—who live extremely busy lives and do not have the time to take regular ballet class. In fact, many of them either took ballet “lessons” when they were young children or are starting from scratch as adults. What they lack in aptitude and suitability is more than compensated for by their open minds and willingness to try their best.

Even so, they sometimes feel discouraged (or lost) in the most basic Absolute Beginner class. Initially, I thought the solution was to offer monthly intensives, but that did not seem like enough.

So, I have created “Finis Fridays.”

Starting this fall, adult beginners can improve their ballet technique in a new series called FINIS FRIDAYS: three different 2-hour classes to be held at the Pearl Studios in Midtown Manhattan.

The first class is titled LET’S DANCE! and will be exactly that. It begins with a short barre followed by exercises in center floor which teach correct body and arm positions; connecting footwork that travels in different directions; the waltz and balancé, and choreographed dances. If time permits, basic jumps will be included.

The second class is titled TURNOUT, EXTENSION, and begins with a warm-up jog, followed by seated and reclined stretches taken from my video Stretch, Turnout & Extension. After this, the students will come to the barre and work on selected barre exercises which will help stabilize turnout and extension. This class will end with relaxing floor stretches.

The third class is PIROUETTES, TURNS. After a short barre, students will practice preparing for and executing pirouettes en dehors and en dedans, châinés, and piqué turns. As always, the emphasis will be on teaching students the “untaught” preparations all good dancers use onstage, but which go unseen by the uneducated eye. We are going to enjoy unraveling the mysteries of turns!

These slowly paced, extremely detailed, step-by-step classes have proven to be remarkably effective. Not only do the students learn the material needed, they also develop self-esteem as they discover that they are capable of doing more challenging ballet work. Some of the more avid students further their knowledge by studying my instructional videos at home, and that too has proven effective.

The Return to Class.

Now, these “Adult Babies” are ready to move confidently with the rest of the class!

Ultimately, it’s the classroom experience where we are all together that makes the biggest difference in helping my “ballet babies” advance. It requires extreme patience and constant instruction on my part, and devoted concentration and muscular involvement on theirs. But time has proven that this is the best way to teach adult beginner ballet students what they need to know. FINIS FRIDAYS will help ballet newcomers learn how to move with graceful dignity and strength, both in the studio, and in the world.

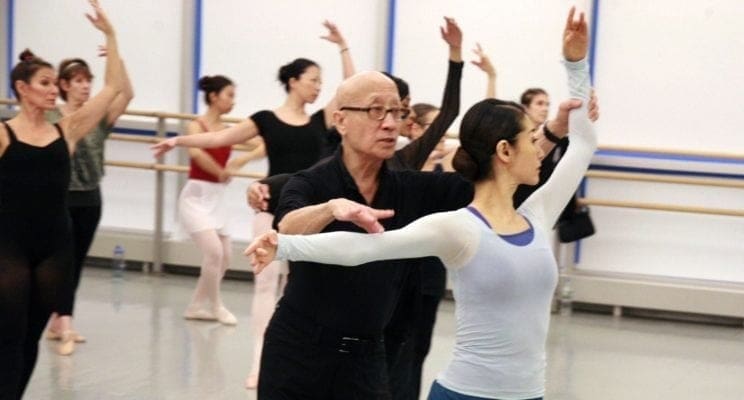
Photo: Finis Jhung and demonstrator Mayumi Omagari show how it’s done. (photo by Stephen von der Launitz)

Private Class with Finis

Balance Your Arabesque

How to place the first arabesque

Beginner Ballet Movement Skills. Lesson 2.
For detailed instructions, see my video, Basic Ballet Movement Skills, Lesson 2.

The beauty of the arabesque depends on the correct placement of the head. The head must be centered on a high chest with energy going up the back of the neck. Stand in front of the mirror in first arabesque on the right foot. Your left arm is in second position, your right arm is extended forward defining the first arabesque position. Do not tilt your head to the right towards your right shoulder and arm. This is why you fall forward when you attempt a piqué arabesque (stepping directly on the half-toe). When you pose in arabesque on your right foot, use your left arm for balance. Reach out and towards the back with your left arm as you extend your R arm forward. Keep your shoulders level with the floor as you press down on the air with both arms. Standing on the right foot, think of listening to the music with your left ear. The rule of balance: Ears Back!

Nail Those Turns!

You Can Turn!

In class last night, every center combination was based on the pirouette en dehors from the fourth position. We began with a slow promenade in retire followed by single pirouettes, upping the tempo gradually. As the exercises progressed and advanced, we combined the pirouettes with pas de bourrées, passé par terre, piqué arabesque, a tombé pose, changements, and sissone fermé. By the end of class, all I had to do was remind some of the students to keep both hips forward over the supporting foot and —voila!—they finished their turns perfectly balanced on half-toe. They were quite surprised to learn that in seconds they could correct a faulty turn simply by standing in “number one” with hips forward over the toe, pushing down into the floor, spotting sharply, and then closing the arms.

If you’re having trouble with your outside turns, you will improve with my video Pirouette Class 2 which breaks down all the component parts step-by-step.

http://finisjhung.com/shop/pirouette-class-2/

PLIE WITH STRENGTH

DEMI-PLIÉ WITH STRENGTH & CONTROL

The demi-plié is the preparation for, and the end of, almost every movement we make in ballet dancing. Therefore, it must be done with strength and control. This is the first and most important lesson I teach all students.

Get in front of the mirror and stand in a wide second position (at least two foot-lengths apart). Your body should resemble a triangle. You are going to stretch up through your head with energy that equals what you put into your feet and legs.

I don’t want you to relax into a picture position. Your knees will bend into the plié position because your feet are going to grip the floor and pull your legs.

To get the feeling of this, curl your fingers over each other. Now grip and pull as hard as you can without letting go. Can you feel the muscles in your fingers, hands, arms and shoulders?

Now do this with your feet to make your plié.

Your toes claw and your feet grip the floor, and slowly pulling your legs into the plié. Reach for the ceiling with your head. You should not see an abrupt drop in height or any jerky movements. Your knees are moving outward, but you barely see a downward movement. That’s because the energy you are using to stretch up is equal to the energy you are putting into your feet and legs.

You are stretching up the back of your neck and trying not to bend your knees. You feel a stretch in your hips as your legs move away from each other. You are pulling in your stomach muscles tightly. You are trying to keep your pelvis up.

The almost-isometric plié is hard work! You can feel that all of your muscles are engaged—from your toes through the foot to your ankles, the outside of your lower legs, your knees, your thighs, your hips, up the front of your body and the back of your neck.

It’s not how low you go; it’s HOW you go. What is important is that the plié begins and ends with your toes.

Now change your thoughts. You relax your feet and spread your toes. You are pressing down on the floor with your feet. Slowly, imperceptibly, your legs are in motion, and you realize you are standing as you began, in the triangle position.

The almost-isometric plié is an “invisible” movement. On count 1, you are standing with straight legs, and on count 8, you are in plié, but you never saw the downward movement. The ascending movement is also “invisible.” You are in plié, and eight counts later, you are standing in the triangle, but when did it happen?

Especially at the barre, try to make all of your pliés—large and small, two feet or one foot, slow or fast—almost isometric. Try to do this in center floor as well, tempo permitting. Then you will always have a plié which will enable you to move with strength and control.

(Excerpted and REVISED from my book The Finis Jhung Ballet Technique: A Guide for Teachers & Students

To learn more about this idea, check out my newest barre videos – http://finisjhung.com/shop/ballet-barre-for-the-adult-absolute-beginner-2/ and http://finisjhung.com/shop/beginner-ballet-barre-2/


The almost-isometric plie – Part Three

2015-Catalog-Cover---UpdatedConcentrated work to develop this special plié is best done in the grand plié in a double-wide second position. Standing like this with feet far apart gives you a better idea of using energy that is equal and opposite.

I tell the students that when they are preparing for the almost-isometric grand plié, they should resemble a triangle: the three points are the head, the right foot, and the left foot. Energy radiates outward from the center of the body through these three points. Energy up through the crown of your head resists the downward pull of your feet.

The almost-isometric plié begins at the floor. Your feet grip the floor in order to pull the legs into the plié position. Think of doing pull-ups when you are hanging from a barre; your elbows bend because you are pulling your body up. Or you can go to the wall barre and pull away from it (as you do my Kitchen Sink stretch). As you pull yourself toward the barre, your elbows bend. The almost-isometric plié works exactly like this.

In the upward movement of the almost-isometric plié, there is no deliberate “pulling up” of the body and straightening of the knees.

You relax your feet, spread your toes, and push down on the floor.

Think of doing a push-up on the floor. As you push the floor, your arms slowly straighten and bring your body up. In the same way, when you are in this plié, you press down on the floor and continue to do so until your legs return to the standing position.

Learning to do all of your pliés like this will build a path of energy from your toes to your head and enable you to move with power and grace.

Here are some important keys:

  1. The plié is the cause that creates an effect.
  2. The plié is a verb, not a noun. It’s an action, not a position.
  3. The plié always has to be “worked.” It is never a relaxed movement unless you are told to do so for stretching purposes

(To be continued. Excerpted from my book The Finis Jhung Ballet Technique: A Guide for Teachers & Students

Be sure to check out our Guidebook Packages


The almost-isometric plié: Part One

If you are going to pirouette, you usually begin from a plié in fourth or fifth position. If you are going to relevé to a pose, you begin with plié on one leg, or fondu. If you are going to jump, there’s a plié before and after. We can’t dance without the plié. The demi-plié initiates and completes almost every movement we make. Consequently, the plié is the most important and the most difficult movement to execute properly. The plié is ballet.

My first serious ballet teacher, Willam F. Christensen (affectionately called Mr. C.) often said, “You know, your legs bend, and they straighten. They bend, and they straighten. That’s it.”
How right he was. Adding on to Mr. C.’s straight talk, I teach pliés emphasizing how the legs bend and straighten. It is important for students to grasp the mechanics of the plié so that they will strengthen their feet, legs, and bodies as they work.

When you dance, you: 1. bend your knees so that you can /2. push the floor with your feet, which will / 3. cause you to either stand with a straight leg on a flat foot, on relevé, or leave the floor and spring up into the air as you / 4. execute a balance, turn, or jump.

We all want to have a plié that will power us strongly and safely as we begin and end our movements. With correctly executed pliés, we can dance with ease and avoid injuries to the feet, ankles, and knees. (To be continued) (Excerpted from The Finis Jhung Ballet Technique: A Guide for Teachers & Students)

PIROUETTE FORMULA

  1. Ears back
  2. Hips forward over the supporting foot
  3. Twist your spine in opposition
  4. Show the “end of the plie” with supporting knee past the supporting toes and arms stretched open
  5. Make a downward spiral driving all your weight down into the supporting toes
  6. Spot sharply
  7. Close your arms without pulling your weight off your supporting foot

Best White Knuckle Barre Exercise of 2015

Grand battement à la seconde.

Grip the barre until your knuckles are white! Pull on the barre! Lift your shoulder! Crunch your body! Kick that leg! Bend that supporting knee! Roll in that supporting foot! And, above all, do not point that free foot!

Teacher Reminder: Change Legs When You Teach

If you teach frequently and demonstrate full out, make sure you change your supporting leg. If you don’t, you will pay for it as you age. Repetitive muscle usage is the curse of the dance teacher. Try not to keep using the same muscles the same way. Find ways to alternate muscle usage and make sure you stretch out those overworked muscles daily so you keep your joints greased and usable and you can continue to do what you love and need to do.

“The End of the Plié”

GuidebookPractice the pirouette en dehors slowly with a promenade:

It requires a great deal of patience to teach students to go to “the end of the plié,” but in the end, it’ll be worth it. As I tell my students, “You either know how to turn, or you don’t—it’s not the weather, it’s not the music, it’s not what you’re wearing or how you feel today: it’s you. You must learn to do your preparation correctly!”

I want to point out that although you begin this preparation facing the mirror in a fourth position, when you turn to “the end of the plié,” you will arrive in a second position on the diagonal (écarté) with your weight over your front foot—with your left arm and knee pointing to corner 8 and your right arm and knee pointing to corner 4.

Your feet have changed from fourth to second; therefore, your arms must also change from fourth to second. Having your arms reaching out in second helps you to balance the final moments of the plié.

Turning your right shoulder and arm to the back while keeping your left arm and shoulder in place marks the crucial moment. Will you see and make “the end of the plié” with both arms stretched open? Your arms must allow your feet and legs to get to “the end of the plié.” Pulling your arms into the finished position before you complete the plié will pull your weight up and away from your supporting toes and put you off balance. This is what makes those dancers we mentioned earlier look like they’re dancing “on top of the floor.”

In fact, this is one of the clues you look for when studying your turns in the mirror. If you are in plié, your arms can’t be closing. Your arms do what your legs do. If both legs are apart and open, so are your arms.

After you see “the end of the plié,” push the floor with both feet, bring your free foot to your knee, your arms to first position, and complete the promenade to the front.

If you make sure that you look for “the end of the plié” each time you turn, then you won’t develop the bad habit of completing your arm movements faster than you can complete your plié preparation.

(Excerpt from my book “The Finis Jhung Ballet Technique: A Guide for Teachers & Students.”)

31_AT2This exercise is shown and explained in my video “The Art of Teaching Turns” http://finisjhung.com/shop/the-art-of-teaching-turns/