BATTEMENT TENDU/DÉGAGÉ

Taught my adult absolute beginners tonight at the Ailey Extension to work their feet correctly and strongly: Sliding your foot out: heel, ball, toes press down and push the floor away to the pointe. Sliding your foot in: toes, ball, heel press down and drag the floor to the supporting foot. Your feet like to think and feel the floor

PIROUETTE EN DEHORS – Your Arms


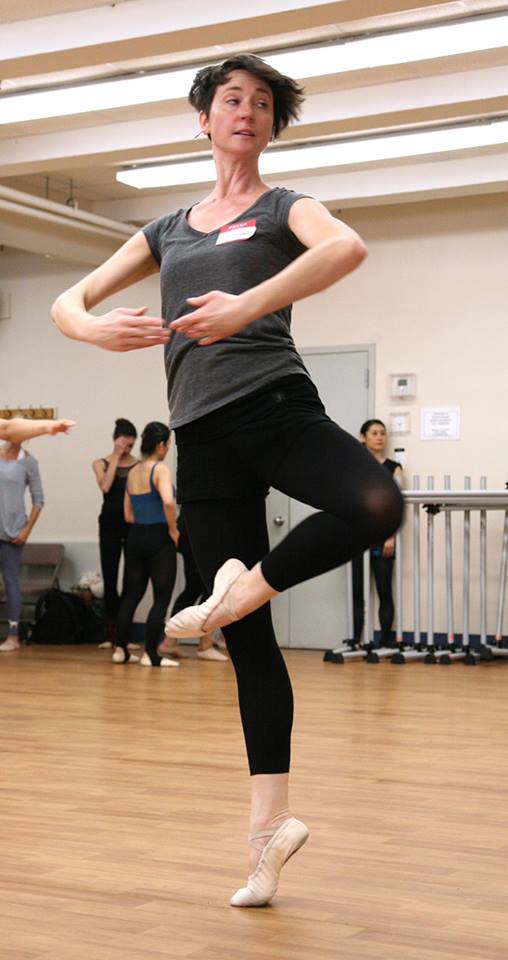
In almost every class I teach, I find myself reminding my students “Don’t be in such a hurry to fall over,” or “Remember, you can’t turn faster than you can fall!”

What I mean is that they should slow down the closing of their arms and make sure that they go to “the end of the plié.” If students don’t know how to make an almost-isometric plié, their feet and legs are relaxed. Not having a muscular connection from the supporting toe to the supporting hip, students are forced to pull up out of the plié. They lift their bodies up by pulling their arms in. They depend on the inward closing movement of the supporting arm. When I see students do this, they look very tense and appear to be dancing “on top of the floor.” They look like they’re following their arms, because all of their energy and weight is in their arms instead of in their supporting legs and feet.

Excerpted from my book “The Finis Jhung Ballet Technique: A Guide for Teachers & Students”

Spot!

Spotting makes the difference: After class today, Ari was practicing her pirouette en dehors with arms fifth high. She could not find her balance. The reason was that she was pulling in her supporting arm in order to turn and did it so quickly with so much force she ending up spinning faster than she could spot and could not control the turns. I told her to slow it down a bit and make each spot separate and distinct. First, plié and push down, then snap your head quickly , which will bring your body around, and then bring the arms into position. At first she didn’t get it, but after a few tries she did exactly as instructed and made a multiple pirouette with four sharply spotted turns. We could see each turn separately—her spotting was that clear and distinct and her balance was perfect. She showed us a series of individual balances: one-one-one-one. After she did it, she was amazed. So were we!

Photo of Belle McDonagh (Elance Adult Ballet School, Victoria, Australia) by Stephen von der Launitz

A PLIÉ IS NOT A PLIÉ

A PLIÉ IS NOT A PLIÉ

Go beyond the position. What are you going to do with that demi-plié in fifth position? What is it for? If you are making the plié as a preparation for a pirouette, pose, or jump, make sure you place your weight over what will be your supporting toe. This will make it much easier for you to rise perfectly balanced on one foot. Form follows function. More details on this idea are in my instructional video “Use Your Head & Turn!”

Use Your Head & Turn!

JUMP TIP #1


JUMP TIP #1

Bounce like a rubber ball: When teaching jumps, use a rubber ball (Spalding is best) to show your students how you want them to bounce off the floor. Raise the hand holding the ball as far from the floor as possible and then bounce the ball as quickly as possible. Point out that the ball does not sit on the floor—you don’t see the ball on the floor. You see it going up. In the same way, when your students plié to jump, their feet should not rest on the floor. They must not plié slowly. They should be stretched up strongly in Number 1, keep their hips up high, make the plie almost isometric, and jump with a fast minimal push from the knee. They should focus on the action of the foot going from flat on the floor to being pointed in the air. Concentrate on the pushing the floor as quickly as possible using the ankle, instep, and toes. Push and point— QUICKLY! For more detailed instructions like this, use “The Finis Jhung Ballet Technique: A Guide for Teachers & Students.”

Guidebook

Glide Your Glissade

Glide Your Glissade: When you glissade sideways in second position, keep your body over the foot that pushes, not the foot that glides or brushes out. In general, students tend to let their bodies follow the foot that brushes out which makes them clunk or lurch over that foot and creates a movement that looks abrupt and uncontrolled. If you are making a glissade to the left side, you should reach to the right and keep your head connected to the right foot while the left foot brushes out. When the right foot pushes away from the floor, your body will be pushed up and over to the left foot, and the right foot that just pushed will then brush into the fifth position. When moving to the left, look towards the diagonal right and keep your weight to the right. In other words, don’t let the foot that brushes out pull your body to it. Wait for the foot that is going to brush in (the right foot) to push you away from the floor and over to the foot that brushed out. Done this way, your movement GLIDES smoothly and gracefully across the floor—which is why it is called a GLISSADE. This movement is broken down and demonstrated beautifully by City Ballet Soloist Antonio Carmena in the Finis Jhung instructional video “Basic Ballet Movement Skills Lesson 1.”


Basic Ballet Movement Skills: Lesson 1

Lift & Kick versus Reach & Push

As you dance forward across the center floor with a battement fondu developpé relevé, it’s a good idea to remember how Gail Grant defines it in “The Technical Manual and Dictionary of Classical Ballet”: “As the supporting leg straightens, the dancer rises to the demi-pointe and performs a developpé at 45 or 90 degrees.”  Sadly, many ballet students execute this step backwards: First they lift and kick the developpé and then use that momentum to lift the supporting heel and pull the supporting leg straight. This pulls your weight away from the supporting toe, looks jerky, and makes you look clumsy.

Here’s how to look better: Reach forward as far as possible with what will be your supporting leg. Point that foot strongly. Correctly align that foot so that it will be under your body on half-toe. Press down firmly on the floor with the ball and toes of your supporting foot. This will make you rise to the half-toe on a straight leg. As you push down and rise, the back foot will automatically be brought forward—it will follow your supporting foot—and then you will complete the developpé. Always time your movements with the transfer of weight to the supporting foot and leg.

Get On Your Leg & Dance!

You are a Star

A star has five points. So do you: your head, your fingertips, and your toes. Energy radiates from the center of your body up through your head and out of your eyes; down both legs and out of your toes; up through your chest and out through your arms and hands. Turn out, stretch out, look out, breathe out, move out. Keep pushing in all directions all the time. Never stop and you will dance better than ever.